Category Archives: The Brick Project
The Brick Project Group C – Week 5
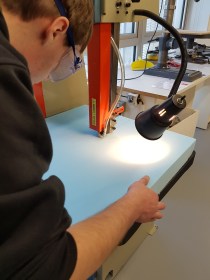
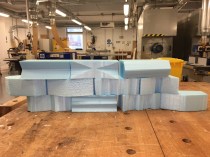
We gathered our brick designs and each member decided on their best ones. Then we took the designs and made blue foam models. This gave us an idea of what the brick would look like on a real life scale
The Brick Project Group C – Week 5
We gathered our brick designs and each member decided on their best ones. Then we took the designs and made blue foam models. This gave us an idea of what the brick would look like on a real life scale
The Brick Project Group C- Week 3
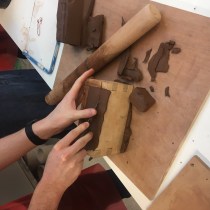
Today we had our workshop induction day with Clare. She introduced us to the clay workshop environment and new type of material as most of us have never worked with clay before. She also showed us how to throw bricks.
The Brick Project Group C- Week 3
Today we had our workshop induction day with Clare. She introduced us to the clay workshop environment and new type of material as most of us have never worked with clay before. She also showed us how to throw bricks.

Final Photography – Group D
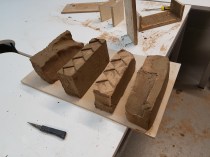
Today we photographed our bricks, the final photo shown above shows the brick iterations in the order we produced them. Competition was close between bricks 3 and 4 as to which became out final prototype, whilst brick 4 has
Final Photography – Group D
Today we photographed our bricks, the final photo shown above shows the brick iterations in the order we produced them. Competition was close between bricks 3 and 4 as to which became out final prototype, whilst brick 4 has
BRICK PROJECT- GROUP C | WEEK SEVEN
Mould Throwing and Firing Figure 1 – Mould with Base Design slotted on This week is dedicated to throwing into the mould, which Marcin and Will participated in. Below (Fig.2) you can see the throwing in action after the Ibstock
BRICK PROJECT- GROUP C | WEEK SEVEN
Mould Throwing and Firing Figure 1 – Mould with Base Design slotted on This week is dedicated to throwing into the mould, which Marcin and Will participated in. Below (Fig.2) you can see the throwing in action after the Ibstock

THE BRICK PROJECT-GROUP C | WEEK SIX
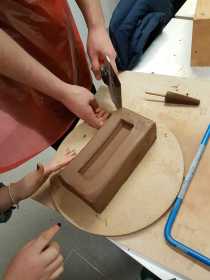
Making the Mould During this week we received the initial brick (Fig.1) that we fired on Week 3 using a pre-made mold to practice on. Using this Will measured the fired brick to gain an understanding of how much the
THE BRICK PROJECT-GROUP C | WEEK SIX
Making the Mould During this week we received the initial brick (Fig.1) that we fired on Week 3 using a pre-made mold to practice on. Using this Will measured the fired brick to gain an understanding of how much the
Brick Group A – Week 6
Week 6 – We experimented with blue foam and made models. Each of us in the group made couple of blue foams models of our designs. After reviewing everyone’s designs, as a group we choose 3 designs to develop into a final
Brick Group A – Week 6
Week 6 – We experimented with blue foam and made models. Each of us in the group made couple of blue foams models of our designs. After reviewing everyone’s designs, as a group we choose 3 designs to develop into a final
Brick Group A – Week 5
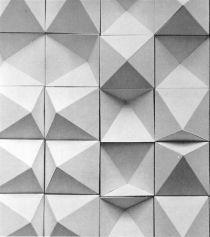
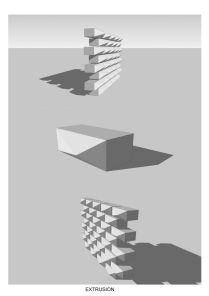
Week 5 – We started to sketch our ideas and used sketch up to develop our designs further. Brick 1: The idea behind the vertical extrusions on the stretcher of the brick is to emphasise the texture and the vertically
Brick Group A – Week 5
Week 5 – We started to sketch our ideas and used sketch up to develop our designs further. Brick 1: The idea behind the vertical extrusions on the stretcher of the brick is to emphasise the texture and the vertically
Brick Group A – Week 4
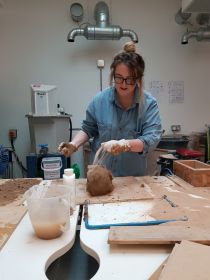
Week 4 – Adam Watruss came in this week and talked through what he did last year. Then he demonstrated hand-throwing clay. Process of hand-throwing clay: The important stage of hand-throwing clay is adding sand to both clay and the
Brick Group A – Week 4
Week 4 – Adam Watruss came in this week and talked through what he did last year. Then he demonstrated hand-throwing clay. Process of hand-throwing clay: The important stage of hand-throwing clay is adding sand to both clay and the
Brick Group A – Week 3
Week 3 – We had our clay induction with Claire Walton. During the induction Claire spoke about the basics about clay and also health and safety. Also we was shown how to hand-throw clay. Firstly, we clamped the mould in
Brick Group A – Week 3
Week 3 – We had our clay induction with Claire Walton. During the induction Claire spoke about the basics about clay and also health and safety. Also we was shown how to hand-throw clay. Firstly, we clamped the mould in
Week 3 – Group D- Clay Induction
In week three, we tested our moulds by using pottery clay to create our bricks. We did this to see how secure our moulds were and what things we would change about them. Our mould had the biscuit joint which
Week 3 – Group D- Clay Induction
In week three, we tested our moulds by using pottery clay to create our bricks. We did this to see how secure our moulds were and what things we would change about them. Our mould had the biscuit joint which
Model Making
After making our first mould we decided to all make a model of what we wanted our brick to look like. From this we went onto choose our favourite model that we had all made. We have then decided on
Model Making
After making our first mould we decided to all make a model of what we wanted our brick to look like. From this we went onto choose our favourite model that we had all made. We have then decided on

Brick Project – Group D – Week 2
On the second week of the Colab project, we were tasked to create a temporary mould. We went to see what facilities we had available. We managed to created a practice mould for our current brick project, we used Plywood
Brick Project – Group D – Week 2
On the second week of the Colab project, we were tasked to create a temporary mould. We went to see what facilities we had available. We managed to created a practice mould for our current brick project, we used Plywood
Brick Group A – Week 2
Week 2 – We planned out our schedule and began design research. For this project we are collaborating with Ibstock Brick who are the largest manufacturer of clay bricks in the UK. Ibstock use the processes identified in the previous
Brick Group A – Week 2
Week 2 – We planned out our schedule and began design research. For this project we are collaborating with Ibstock Brick who are the largest manufacturer of clay bricks in the UK. Ibstock use the processes identified in the previous
Brick Group A – Week 1
Week 1 – We did basic research about bricks. What makes a brick: Bricks are made from clay-bearing soil, lime, and sand (concrete materials) Process of making a brick: Clay preparation – It is important that the clay is prepared
Brick Group A – Week 1
Week 1 – We did basic research about bricks. What makes a brick: Bricks are made from clay-bearing soil, lime, and sand (concrete materials) Process of making a brick: Clay preparation – It is important that the clay is prepared

You must be logged in to post a comment.