As our concept developed and our design became finalised, we recorded this progression as we went. From basic floor plans to final plans, also sections and visuals rendered and un-rendered.
BASIC FLOOR PLAN
A basic floor plan to begin to understand the main features of the building, it also allowed us to figure out spacing and movement of both the performers and then audience.

FINAL FLOOR PLANS:
- Initial floorplan drawing
- Rendered final floor plan highlighting the design idea, and also showing the materials that will be used to create the set design.


FINAL SECTIONS:
- Initial section drawing
- Rendered section, highlighting the materials we intend to use for the final set design. Materials are minimalistic to enhance the conceptual idea behind the design.


Figures 1&2 (rendered basic sections, above clockwise from left to right)

VISUALISATION:
Initial visuals of the design concept…


Finalised visuals…


Figure 3 (above, left)
Showing the transition between the two scenes: using the same frame for both scenes. The transition will involve the following:
- Untying of the fabric panels to show a change of scene and mood
- Projection of the tree backdrop onto the back wall of the stage
These small changes ensure that the transition between the two scenes remains smooth and doesn’t become a distraction from the stage performance.
DIMENSION DETAILING
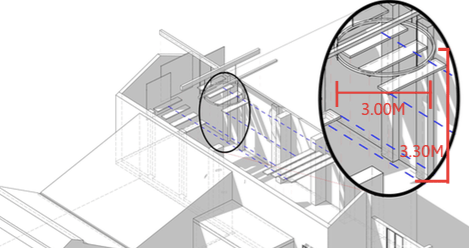
FRAME:
Height (from ground level): 3.3m
Diameter: 3m
Width of tubing: 100mm
FABRIC PANELS X4 (tied together for Scene 4.i, untied for Scene 4.ii)
Length: 3.3m
Width: 150cm
The location, design and elements of this concept are simple but will work together to create a stage set that enables the performance to be enhanced and impacted by the elements surrounding it.
REFERENCES
Figures 1, 2 & 3 were created by the the group designing the stage set for Scene 4.i and have been used with their permission.
Group 4 – Lydia Walton

You must be logged in to post a comment.